Try Zipchat in Action!
Enter your store URL to see how Zipchat would behave.


Integrate Shopify with Instagram - 6 Simple Steps to Set Up Instagram Shopping
If you’re wondering how to integrate Shopify with Instagram, the process is easier than most guides make it seem. In about an hour, you can sync your products, tag them in posts, and start driving checkout-ready traffic straight from Instagram.
The Instagram shopping feature turns your posts and Reels into a storefront. You’ll connect Shopify, link your Facebook and Instagram accounts, sync your catalog, and enable product tagging, all without code.
Quick 6-Step Setup (Estimated time: ~45–60 minutes)
- Connect your Instagram and Facebook accounts → [5 min]
- Verify Facebook Business Manager access (required for Shops) → [5 min]
- Sync your Shopify app store with Facebook Commerce Manager → [10 min]
- Enable Instagram Shopping in Shopify’s Sales Channels → [10 min]
- Submit your shop for Instagram approval (usually within 24–48 hours) → [5 min setup, 1–2 days wait]
- Start tagging products in posts and Stories → [10 min setup]
Instagram isn’t just where your customers scroll, it’s where they shop. Over 200 million Instagram users visit a business profile every day, and 70% of shoppers turn to Instagram for product discovery (Meta Business, 2024). Integrating your Shopify store with Instagram bridges discovery and checkout, letting you sell where your potential customers already spend time.
Instagram Shopping allows you to tag products directly in posts, Reels, and Stories, turning engagement into transactions with just a few clicks. Shopify handles the back end (inventory, orders, and fulfillment), while Instagram drives real-time exposure and social proof. According to Shopify’s internal data, brands that activate Instagram Shopping see a measurable lift in both traffic and conversion rates (Shopify Commerce Trends Report, 2024).
Core Instagram Features to Use With Shopify Online Store (Product Tags, Checkout, Live Shopping)
Integrating Shopify with Instagram unlocks tools designed to make shopping effortless right inside the app. Also, when you connect Instagram ads to your Shopify store, you create targeted campaigns that drive traffic and sales.
Below are the core features you should enable first.
Product Tags
Product tags let you tag specific items in Instagram posts, Reels, and Stories, so users can tap and buy directly from your Shopify catalog.
- How to enable: Connect your Shopify product catalog through Meta Commerce Manager, then enable Shopping in your Instagram settings (Shopify Help).
- Why it matters: Tagged social posts drive up to 37% higher engagement and make every piece of content shoppable (Meta Business Insights, 2024).
- Tip: Add tags early in carousels and Reels where tap-through intent is highest.
Instagram Checkout
Instagram checkout lets users purchase products without leaving the app, boosting conversions and reducing drop-offs.
- How to enable: Available in select countries; activate through Meta Commerce Manager → Settings → Checkout.
- Note: Currently supported for U.S.-based stores and select global regions.
- Why it matters: Shopify reports merchants using in-app checkout see conversion rates up to 1.5× higher than external-link purchases.
Live Shopping
Live Shopping allows brands to tag and sell products directly during a live broadcast, turning engagement into real-time transactions.
- How to enable: Go to Instagram Live → Add Product Tags (requires approved Instagram Shop).
- Best for: Launches, limited drops, and creator partnerships where urgency drives action.
- Why it matters: Meta found live video with shopping tags generates up to 3× longer view times versus non-shoppable streams.
Stories & Reels
Stories and Reels offer short-form, high-impact product placements with clickable product tags.
- How to enable: Use the product sticker when creating a Story or Reel after syncing your Shopify catalog.
- Best practices: Feature user-generated content or unboxing moments to build trust and drive intent (GetFlowbox Blog, 2024).
- Pro tip: Combine Stories + product tags with Zipchat AI campaigns on WhatsApp or Messenger to re-engage viewers who didn’t convert.
How to Integrate Shopify with Instagram — 6 Steps (Detailed Checklist)
The Meta Business Suite offers a comprehensive platform for managing social media, while the Commerce Manager is a specialized tool within it for managing online stores and sales. It is important to meet the basic setup requirements to have a seamless integration of Shopify with Instagram. These include:
- A Shopify store with active products and sales channels enabled
- A Meta Business Manager account
- A Facebook Page connected to your store
- An Instagram professional account (Business or Creator)
- Access to Meta Commerce Manager
Once you’ve got those ready, follow this six-step walkthrough to get your store live on Instagram Shopping.
Step 1: Confirm Eligibility and Region Settings
⏱ Time: ~5 minutes
First, ensure your country supports Instagram Shopping and that your store meets Meta’s commerce eligibility requirements (Meta Commerce Policy, 2024).
- Your products must be physical goods (no digital-only items).
- Your Instagram account must represent a verified business and comply with Shopify’s product listing standards (Shopify Help).
Step 2: Convert Your Instagram Profile to a Professional Account
⏱ Time: ~3 minutes
On Instagram:
- Go to Settings → Account → Switch to Professional Account.
- Choose Business (recommended for eCommerce business).
- Link to your Facebook Page under Public Business Information.
This enables insights, product tagging, and contact options. According to Meta’s internal data (2024), business profiles generate 25% more profile actions than personal accounts.
Step 3: Connect Shopify to Meta (Facebook & Instagram Sales Channel)
⏱ Time: ~10 minutes
Inside your Shopify admin, go to:
Settings → Apps and sales channels → Facebook & Instagram by Meta → Start setup.
You’ll be prompted to:
- Connect your Facebook Page
- Link your Instagram business account
- Connect your Meta Business Manager
Once complete, Shopify syncs your product catalog automatically with Meta Commerce Manager.
Step 4: Set Up Your Product Catalog in Meta Commerce Manager
⏱ Time: ~8 minutes
Head to Meta Commerce Manager → Catalogs → Add Products.
- Choose Upload from Shopify or Sync existing catalog.
- Ensure all items include clear titles, pricing, images, and inventory levels.
- Verify that your domain is approved (via Meta Business Settings → Brand Safety → Domains).
Note: Shopify automatically pushes product updates, so no double management is needed.
Step 5: Enable Instagram Shopping to Start Selling
⏱ Time: ~5 minutes
In the Instagram app:
- Go to Settings → Business → Shopping.
- Select your synced product catalog.
- Tap Submit for Review.
Meta typically approves catalogs within 24–48 hours. Once approved, your profile gains a new Shop tab and the ability to tag products in posts, Stories, and Reels.
Step 6: Tag Products in Shoppable Posts, Stories, and Reels
⏱ Time: ~5 minutes
You’re ready to sell. When creating content:
- Tap Tag Products before posting.
- Select up to 5 products per image or 20 per carousel.
- For Stories, use the Product Sticker.
Catalog Sync vs UGC Feeds
When you connect Shopify with Instagram, you’ll eventually face a decision:
Should you rely on Shopify’s native catalog sync, or use a UGC (user-generated content) feed app like Taggbox or Flowbox?
The short answer: Use native catalog sync for shoppable product pages, and UGC feeds for discovery sections like homepages or lookbooks. Both serve different purposes, while one drives conversion, the other drives inspiration.
Option 1: Native Catalog Sync (via Meta Commerce Manager)
The native catalog sync automatically updates your Shopify product data on Instagram, ensuring pricing, inventory, and variants remain consistent across both platforms.
Pros:
- Direct Shopify-to-Meta integration (Shopify Help)
- Auto-sync for product details and availability
- Zero impact on Core Web Vitals
- Supports Instagram product tagging and Checkout
Cons:
- Limited flexibility for aesthetic display
- Doesn’t showcase community photos or influencer UGC
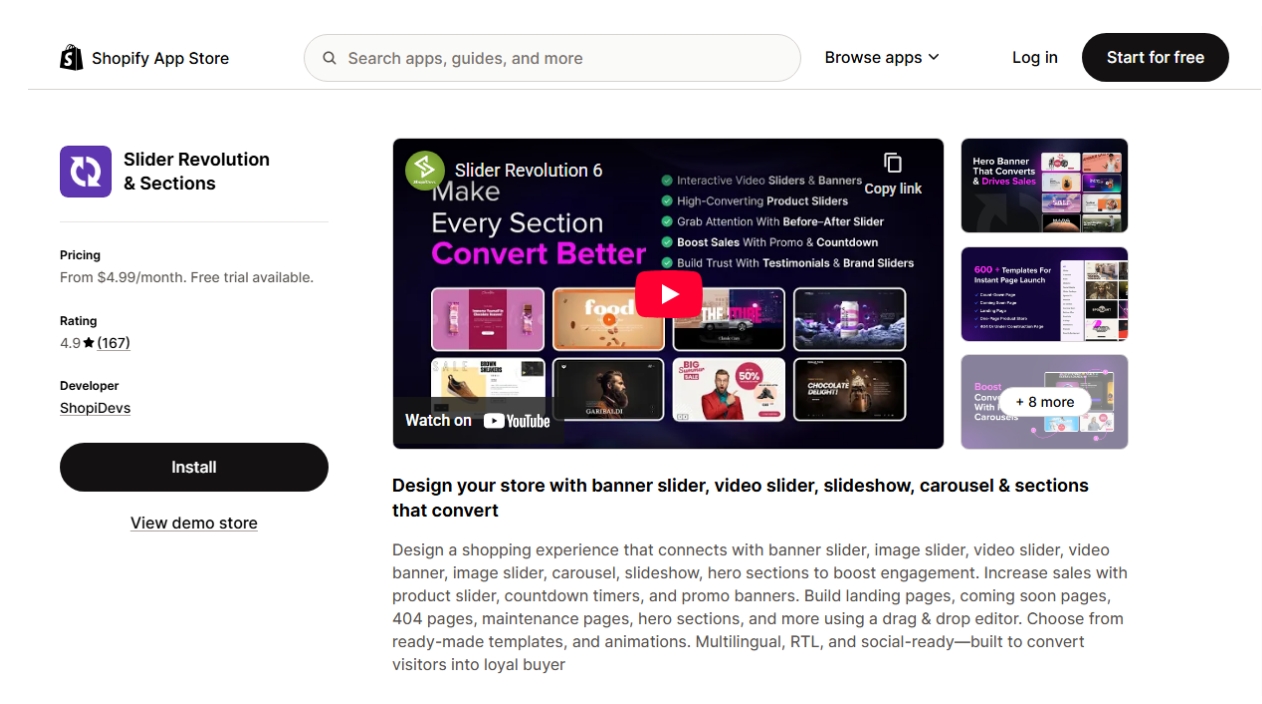
Option 2: UGC or Shoppable Instagram Feed Embeds (via Apps like Taggbox, Flowbox, Elfsight)
UGC feeds visually display tagged Instagram posts on your Shopify store, adding social proof and inspiration from real customers.
Pros:
- Visually engaging, integrates Instagram grids, carousels, or stories
- Encourages trust and discovery through real user content
- Ideal for lifestyle or brand storytelling sections (Flowbox Blog)
Cons:
- Adds JavaScript widgets, which can slightly impact page load speed
- Some apps require manual moderation or paid plans for advanced filters
- Doesn’t sync product inventory or price
App Comparison Table

Embed Instagram Feeds — Implementation & Performance Tips
When you add Instagram feed to your Shopify store, you are making your site look dynamic and social-proofed, but if implemented poorly, it can slow down your store and hurt your Core Web Vitals.
The key is to embed smartly, using lazy-loading and structured data so you preserve both performance and SEO.
How to Embed an Instagram Feed on Shopify (Step-by-Step)
Use a lightweight app or manual embed to display your Instagram posts on Shopify, while lazy-loading images to protect speed scores.
Here’s how to implement it correctly:
- Choose an embedding method
- Add the embed code to your theme
- In your Shopify admin, go to Online Store → Themes → Edit Code.
- Insert the embed code in the appropriate section (e.g., index.liquid or a custom block in GemPages or PageFly).
- Lazy-load the feed for performance
- Wrap your script in an Intersection Observer to delay load until the section scrolls into view:

- Add descriptive alt text
Each image in your feed should include an alt attribute with brand or product context (e.g., alt="Customer wearing our blue linen shirt"). This improves accessibility and SEO relevance for image searches. - Validate with Lighthouse or PageSpeed Insights
Test after embedding. Your LCP (Largest Contentful Paint) should remain under 2.5s, and CLS (Cumulative Layout Shift) should stay below 0.1. - Cache your feed
Apps like Flowbox or Taggbox support caching so your site doesn’t re-fetch Instagram posts on every page load. Cached feeds = faster first paint and lower API calls.
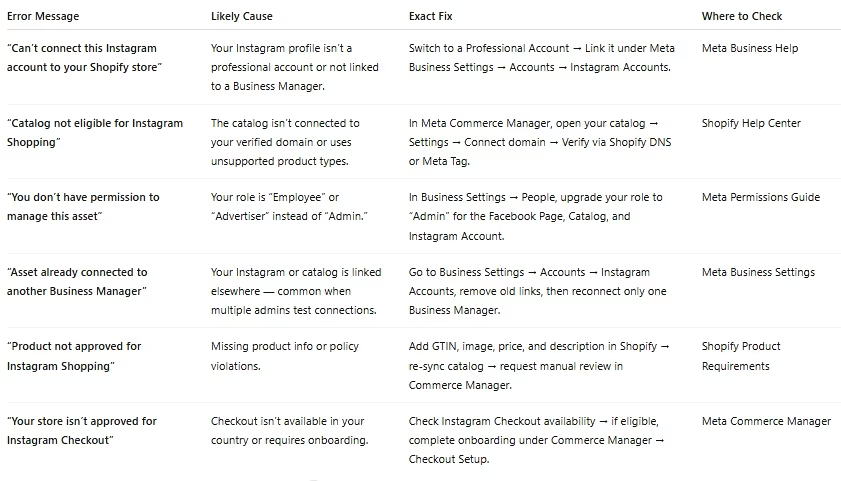
Troubleshooting: Common Errors & Exact Fixes (Business Manager, Catalog, Permissions)
Even with a clean setup, connecting Shopify and Instagram can throw a few confusing errors, usually tied to permissions, catalog syncs, or Meta Business Manager settings.
This playbook lists the most frequent error messages you’ll see, their likely causes, and step-by-step fixes you can apply without escalating to Meta support.
Note:
Most Shopify–Instagram connection errors come from missing permissions, unverified domains, or duplicate catalog links, all of which are fixable in Business Manager settings.
Quick Diagnostic Checklist
Before diving in, confirm these four prerequisites are correct:
- You’re using a Professional Instagram account connected to a Meta Business Manager.
- You’re an admin, not an employee role, on both the Facebook and Catalog.
- Your Shopify domain is verified inside Meta Business Manager.
- Your product catalog syncs from Shopify to the same Business Manager as your IG account.
If any of these are missing, most connection errors will persist.
Common Error Messages and Fixes
Fixing Permissions Across Shopify & Social Media (Facebook & Instagram)
Permissions are the #1 culprit behind failed integrations. Here’s the correct permission hierarchy you need to maintain:
- Shopify Owner / Admin → Has full access to Sales Channels → Facebook & Instagram.
- Meta Business Manager Admin → Manages connected Page, Catalog, and Instagram Account.
- Instagram Professional Account Owner → Linked to the same Business Manager and verified via Meta.
If any one of these three roles isn’t an admin, connection requests fail silently or show the “can’t connect” message.
Quick Fix:
- Go to Meta Business Settings → Business Assets → Assign Partners → Give full control (Manage catalog + Manage page + Manage account).
- Reconnect the channel in Shopify → Facebook & Instagram → Start setup again.
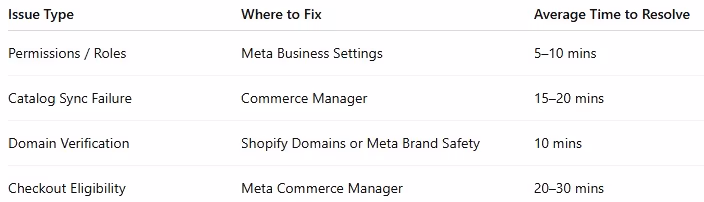
Quick Recovery Summary
Next: Optimize Your Instagram Shopping Performance with Engaging Captions
Once your connection is stable, move to the next section to learn how to track results and optimize conversion through analytics and content strategy.
SEO & Performance: Native Catalog Sync vs Embedded Feeds
Not all Instagram integrations are equal when it comes to SEO visibility and Core Web Vitals. The method you choose, native Shopify catalog sync or embedded UGC feed, affects how search engines index your product data and how fast your pages load.
Note:
Use native catalog sync for SEO-critical pages (PDPs, collections) and embedded UGC feeds for engagement zones. Lazy-load embeds to protect Core Web Vitals.
Native Catalog Sync (Best for SEO)
When you connect your Shopify product catalog directly to Meta Commerce Manager, your tagged products inherit structured data automatically from Shopify’s JSON-LD schema.
That means your product pages stay indexable and eligible for rich snippets (price, availability, review stars).
Advantages:
- Structured data preserved: Shopify’s built-in Product schema stays intact.
- Faster load times: Catalog sync runs server-side, no external scripts.
- Link equity maintained: Product tags open canonical PDPs, not Instagram redirects.
Best used on:
- Product detail pages (PDPs)
- Collection pages with shoppable carousels
- Landing pages with embedded Meta product grids
Frequently Asked Questions — Quick Answers
Below are the most common questions about integrating Shopify with Instagram Shopping:
What is Instagram Shopping?
Instagram Shopping lets users browse and buy products directly from posts, stories, and reels by syncing your Shopify catalog with Meta Commerce Manager.
Why can’t I connect my Shopify store to Instagram?
Connection issues usually stem from account permissions, missing catalog access, or incomplete Meta Business Manager setup.
Can I tag products in Reels and Stories?
Yes. Businesses can tag the Shopify products in Instagram Reels and Stories if Instagram Shopping and product catalog sync are enabled.
What’s the difference between product tags and embedded Instagram feeds?
Product tags are native shoppable links that boost SEO, while embedded feeds are UGC widgets for engagement but don’t pass SEO value.
Why don’t my tagged products show up on Instagram?
Tags fail to appear if products aren’t approved in Meta Commerce Manager or if Shopify sync hasn’t completed.
Does Instagram Checkout work in all countries?
No. Instagram Checkout is only available in select countries where Meta Payments are supported, so confirm regional availability.
Can I use multiple Instagram accounts with one Shopify store?
Yes, but each Instagram account must be linked to a unique Meta Commerce account and product catalog.
How do I measure sales from Instagram Shopping?
Track sales through Shopify’s Sales by Channel report, Meta Pixel data, and tagged product performance in Commerce Insights.
Next Steps — Complete Setup & Try Zipchat (7-Day Free Trial)
If you’ve followed this guide, your Shopify–Instagram integration should now be fully functional, product catalog synced, tags working, and feeds optimized for both UX and Core Web Vitals.
The next step? Make that traffic count.
With Zipchat AI, you can:
- Instantly engage visitors from Instagram and WhatsApp with proactive, conversational prompts.
- Deflect WISMO questions (“Where’s my order?”) and recover stalled checkouts before they bounce.
- See which tagged posts and UGC actually drive conversions, no extra dashboards required.
Try Zipchat Free for 7 Days
No credit card required. Cancel anytime.
Start 7-Day Free Trial
or
Book a Setup Call to have a specialist walk you through your Shopify and Instagram automation setup.
What other merchants say
“Zipchat helped us recover 22% more abandoned carts — especially from Instagram traffic.”
— Maya, DTC Brand Owner
“We connected Zipchat to WhatsApp in under an hour. The automation feels human.”
— Alex, Shopify Plus Merchant


Try Zipchat for free